
From planning and design to construction and materials, we'll walk you through every step of the process to help you replace your trim and doors.
Step 4: Measure Your Project
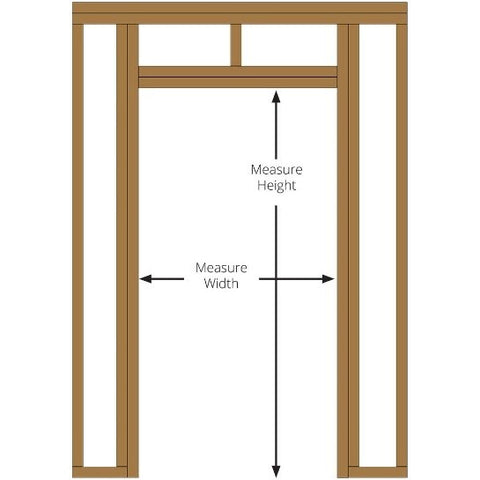
Measuring Your Opening
Measuring accurately is the foundation of a successful project! In the tabs below you will find helpful tips to measure your project properly and some useful instructional videos.
Tools Needed:
- Tape Measure
- Notepad
Door sizes:
- Door widths are commonly 12” to 36” (increasing in 2” increments i.e. 12”, 14”, 16”, etc.).
- Standard door heights are one of the following: 78”, 80”, 84”, 90″ and 96” custom heights exist for shorter and taller doors. Reach out to your Turkstra Lumber Build-It-Better Coach for more information regarding custom size doors.
- Door thicknesses are usually 1-3/8” or 1-3/4” for interior doors.
Rough stud openings (RSO):
The rough opening is the width of the opening between the studs, and the height from the header to the floor before any door jamb is installed. It is important to note that the thickness of your finished floor will affect the height measurement.
The following calculations will help if you do not have a rough opening already framed out and are either installing a new wall, or retrofitting an old wall to have a door installed.
Note that for load bearing walls, an engineer’s drawing may be required and is preferable to ensure that there is no loss of structure in your home.
When framing rough openings for single- swing or bifold doors, the general rule of thumb is as follows:
- Width of door plus two inches (for a 32” door, the door studs should be a minimum of 34″ apart)
- Height of door plus two inches (for an 80” door, the header should be a minimum of 82″)
IMPORTANT TIP: Keep in mind the thickness of the jambs and floors when measuring your RSO!
Using this rule the rough opening needed for a 32 X 80 door is actually 34″ by 82″.
Double Swing Door RSO
- (Door Width x 2) + 2” = double door RSO width
- Door height + 2” = double door RSO height
- When calculating RSO for a double swing door (or double bi-fold) the calculation adds the second door’s width to the formula above, but the height remains the same at door height.
Pocket Door RSO
- (Door width x 2) + 2” = pocket door RSO width
- Door height + 4” = pocket door RSO height
- * Typical calculations only, refer to pocket frame instructions or talk to your coach for specific requirements
- For a pocket door RSO, the calculation is as above. Remember that with pocket doors you need to create a rough opening with extra space for the track to fit inside of the wall, this will be covered by drywall and not seen.
Double Pocket Door RSO
- (Door width x 4) + 2” = Double Pocket door RSO width
- Door height + 4” = Double Pocket door RSO height
- * Typical calculations only, refer to pocket frame instructions or talk to your coach for specific requirements
- When framing a rough opening for a double pocket door that slides out on either side of the opening you need to multiply your door width by four and add two inches in order to account for two tracks and two doors.
- Drywall will cover the track on either side of the door opening but the framing must be in place behind the wall, this is a cheaper alternative to having both doors coming from the same side however it does take up a fair amount of wall space and not all walls have the space to fit a door of this type.
- The track is wide enough to fit both doors within the same side of the opening, this method may cost a little more but has the advantage of taking up less space while still allowing the opening size of a double door.
Barn Door RSO
- For a barn door there are multiple variables to consider, ensure you consult with your Project Coach to guide you through this process.
- Things to consider:
- door must be larger than the finished opening
- adequate Clearance above the door opening to accommodate the track and hardware
- adequate space beside the opening for the door to slide open
- no switches, or fixtures that will be covered when the door is open
- drywall return vs jamb and casing in the opening will determine the door size required and projection from the wall
- adequate framing within the wall to accommodate the weight of the door and hardware
- consider mounting a header board to the wall above the opening. Typically, 1” x 6”, to support the weight of the track.
Bypass Closet Door RSO
- (Door width x 2) + 1″ = Bypass Closet Door RSO width
- Door height + 4″ = Bypass closet door RSO height
- The doors should have a slight overlap in the middle so there isn’t a gap. The opening will be slightly smaller than the doors after adding jamb to both sides. Additionally, you have to account for the track and floor guides above and below the doors. Always read and follow the bypass door track manufacturer’s specifications for space requirements.
Door Thickness 1-3/4 Inch VS 1-3/8 Inch
How To Properly Measure an Interior Door
Measuring Your Existing Doors
Measure the width, height and thickness of each door that will be replaced.
Measuring for doors can be simple to do yourself, but some items need to be kept in mind when measuring your project, which prohibits smooth operating of your new door:
- Existing door is twisted or warped
- House may have settled over time, bringing the door opening out of square
- Hardware location may vary from door to door (incl. hinges, handles, etc.)
Measuring For Trim
Tools required:
- Measuring tape, measuring wheel (optional), notepad
The most common jamb widths are:
- 4-5/8” (for 2×4 wall with 1/2” drywall on each side)
- 4-7/8” (for 2×4 wall with 5/8” drywall on each side)
- 6-9/16” (for 2×6 wall w/ 1/2” drywall on each side)
- 6-7/8” (for 2×6 wall w/ 5/8” drywall on each side)
It is important to note that jamb widths can vary due to wall construction, and you should confirm your widths before ordering.
Jamb lengths come in various lengths to accommodate various door heights. Your opening will likely be smaller than the standard jamb length and this allows the jamb to be cut to exact length on-site to fit the door perfectly..
An example of jamb ‘sets’ are (consult your Build-It-Better coach for your specific requirements):
- A single set of jambs for an 80” door typically includes 2 pcs at 7’ and 1 pc at 3.5’.
- A double set of jambs for an 80” door typically includes 3 pcs at 7’
Door Stop:
- Door stop is required for swing doors and can also be used to hide track in bypass closet doors.
- Measure the same way you would for jamb ‘sets’
Casing is the trim that goes around your doors and windows, it is usually required for both sides of your interior door and for the inside wall around windows and exterior doors. Its purpose is to cover the gap between the framing and the door or window jamb, it is sometimes off-set to create what’s referred to as a ‘reveal’ with a small portion of the jamb left visible behind the casing.
- When measuring for casing, be sure to consider added length to accommodate for mitred corner cuts..
- Shaped window trim requires highly accurate measurements to be taken. A template, or tracing may be required by the manufacturer before they will produce your round trim to ensure there are no errors.
Backband is a detail trim that attaches around the casing to give the casing profile more depth. There are several options available to match casing to corresponding backband. See your local Build-It-Better Centre for more information..
Baseboard - Moulding applied where walls and floor meet. Measure the perimeter of all walls that require baseboard..
A measuring wheel can be a great asset in taking these measurements, but for smaller jobs, a handheld tape measure will suffice.
- Include the inside walls of closets when measuring, as finishing trim is recommended inside of closets to finish the bottom of the walls to prevent dust, dirt, and debris between the floor material, and the drywall cavity.
- Include additional material for cuts and margin of error. An extra 5-10% of the total material amount is recommended.
Shoe Moulds: optional piece of trim that is installed at the bottom of the baseboard to hide flooring imperfections. Measure the perimeter of all walls that require shoe mould. A measuring wheel can be a great asset in taking these measurements, but for smaller jobs, a handheld tape measure will suffice. Include additional material for cuts and margin of error. An extra 5-10% of the total material amount is recommended. As shoe mould is optional, you may not require it in all areas of the house (measurements may not match baseboard, and typically not required for carpeted areas).
Determine Type and Quantity of Hardware Needed
Handle Function
When picking new, or replacement door handles it is important to consider the function that you need for the space. For example, you will need a different function for a bathroom door than you would for a closet door. Additionally, it is important to note handle direction as certain handles are specific to ‘left’ or ‘right’.
Handing - Handing is the direction of the swing of the door in relation to the framing. Use the following as a guide to determine the handing of your doors. This will be important information when ordering pre-hung doors, or when ordering knobs/levers that are right hand or left hand specific.
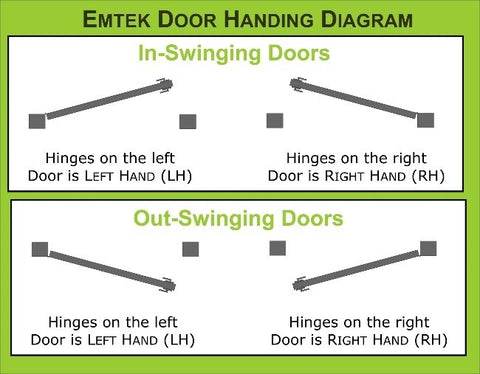
Which Way Does Your Door Swing?
Below are the common handle functions:
Passage - This type of handle is often used for rooms where a locking function is not needed. Passage handles are often used for closets, bedrooms and utility rooms. It can also be found on your entry door alongside a dead bolt as that provides sufficient security.
Privacy - This type of handle has a lock, but instead of needing a key it can be unlocked by a coin, or flat object or pin inserted into a slot on the outside and turned. These are commonly used for bathrooms and bedrooms where privacy is required but access may be necessary if the door is accidently locked.
Entry or Keyed - This type of handle is mainly used with entry doors that do not have a deadbolt or other locking system. These can be used on doors leading to back yards or garages, or any room where security is required. Entry handles have a key that will unlock them from the outside and a button or thumb turn switch on the opposite side.
Dead Bolt - This type of lock does not have a handle, and it has a thick bolt that goes into the door jamb for security. Often used with a passage handle for entry doors.
Dummy - This type of handle is designed for closets and double swing doors. Dummy handles do not require a hole drilled in the door to function. They can be mounted on the surface and a bullet, or magnetic catch is used to hold the door closed.
Electronic Locks - This type of lock commonly uses a keypad with a numbered code for entry. These will often still have a key for entry as well, and are powered by an internal battery. Most modern electronic locks have Bluetooth or Wi-Fi connectivity.
Additional Hardware
Hinges
When deciding on hinges it is important to select the correct type, and quantity. i.e. A large, heavy door may require three or even four hinges, where as a hollow-core door may only need two. Additionally, a hollow door may only require simple hinges, but a large door may need ball bearing hinges to operate effortlessly. Ask your Build-It-Better coach for their recommendations.
Door Bumpers
There are several different methods to stop doors in a desired position or to prevent them from hitting a wall or other surface, here are some common door bumpers:
- Spring Stops - these are mounted on the baseboard and stop the door from hitting the wall with a spring and a rubber cap.
- Rigid Stops - a type of door stopper that has a fixed metal pin with a rubber cap on the end. This is more secure than the spring stop, but can cause the door to bounce back when opened with force.
- Hinge Pin Bumper - this type of door stop goes on the hinge pin in your door. These act as a bumper stop and can be adjusted to stop a door at a desired point.
- Cup and Magnet - this is similar to the hinge pin stop but it has a magnetic cup to hold the door open until it is pulled closed.
- Floor Stops or Dome Door Stops - attached firmly into the ground at the door’s desired stopping point. These are the most secure of all door stops, but they are not discreet as the small floor mounted piece will be visible when the door is closed.
- Bullet Catches - this is a term for a small ball and cup type of fixture that holds a door closed. Bullet catches are often used with a dummy handle.
- Magnetic Catch - designed to keep a door closed by securing the door in a closed position.
- Door closers - devices that will automatically pull a door closed. There are many different types including a style with an articulated arm that pulls the door shut or hinges with springs that swing the door shut.
- Pocket Door Lock - there are several different pocket door locks and closure methods. Everything from keyed, privacy, and passage to simple round inset handles that allow opening and closing. Ask your Build-It-Better Coach to see available options.
- Flush Bolts - used with double doors when one is to be kept closed, but can still open when needed. These are routed, or chiseled into the door and a hole is drilled into the floor or top jamb to hold the door closed.
Other Related Hardware:
Information on measuring for other door hardware can be found at your local Turkstra Lumber Build-It-Better Centre, or on the product packaging itself. Ask your Build-It-Better coach for more details.
Standard VS Ball Bearing Hinges
Replacing an Existing Door

Visual Learner? We get it.
We get it. Turkstra TV is full of helpful videos to get you up and running on your next home improvement project.

Our Coaches have your back
Need help? Talk to our professional coaches - it's free.
Get preferred pricing & exclusive promos with Build-it-Better.
Receive exclusive, members-only discounts on select products each month! Sign Up for Free >
